SC-300:規劃和實行身分識別治理策略
- 規劃和實作權利管理 (Plan and implement entitlement management)
- 規劃、實作和管理存取權檢閱 (Plan, implement, and manage access review)
- 規劃、實作和管理存取權檢閱 (Plan and implement privileged access)
- 監視和維護 Azure Active Directory (Monitor and maintain Azure Active Directory)
Lab 25 ~ Lab 31
Azure Active Directory
- 預設網域
- Identity Governance 身份治理
Entitlement management
Catalogs
Access packages
Terms of use 使用規定(使用條款)
Settings
Privileged Identity Management
Azure AD roles
|
|
|
|
|
Entitlement management |
Catalogs |
Catalogs are used to group related
resources and access packages.
Access packages: For access that requires
the approval of an employee's manager or other designated individuals. Two or more organizations are collaborating
on a project, and as a result, multiple users from one organization will need
to be brought in via Azure AD B2B to access another organization's resources (Lab 25) |
|
Terms of use |
(Lab 26) |
|
|
Settings
|
lifecycle of external users
By default, a deleted user is in a
deleted state in Azure AD for 30 days
select what happens when an external
user, who was invited to your directory through an access package request
being approved, no longer has any access package assignments. This can happen
if the user relinquishes all their access package assignments, or their last
access package assignment expires. By default, when an external user no
longer has any access package assignments, they are blocked from signing in
to your directory. After 30 days, their guest user account is removed from
your directory. (Lab 27) |
|
|
Privileged Identity Management |
Azure AD roles |
|
|
|
|
Privileged Identity Management:
管理、控制和監視組織內重要資源的存取
可以將 Azure 和 Azure AD 資源的即時特殊許可權存取權提供給使用者,,並可監看這些使用者如何使用其特殊許可權存取。
也就是在指定的日期期間內,被指派的使用者可以自行提升為指定角色的權限
Here are some of the key features of Privileged Identity Management:
- Provide just-in-time privileged access to Azure AD and Azure resources
- Assign time-bound access to resources using start and end dates
- Require approval to activate privileged roles
- Enforce multi-factor authentication to activate any role
- Use justification to understand why users activate
- Get notifications when privileged roles are activated
- Conduct access reviews to ensure users still need roles
- Download audit history for internal or external audit
- Prevents removal of the last active Global Administrator role assignment
Lab 25: Create and manage a catalog of resources in Azure AD entitlement management
A catalog is a container of resources and access packages. You create a catalog when you want to group related resources and access packages. Whoever creates the catalog becomes the first catalog owner. A catalog owner can add additional catalog owners. You must create and configure a catalog in your organization.


The user that created a catalog becomes the first catalog owner. To delegate management of a catalog, you add users to the catalog owner role. This helps share the catalog management responsibilities.


Lab 25結束
Access package沒有Lab,自行建立截圖留紀錄


Lab 26: Add terms of use and acceptance reporting
Azure AD terms of use policies provide a simple method that organizations can use to present information to end users. This presentation ensures users see relevant disclaimers for legal or compliance requirements. This article describes how to get started with terms of use (ToU) policies.
You must create and enforce a ToU policy for your organization.


Use the Expire starting on and Frequency settings to specify the schedule for terms of use expirations. The following table shows the result for a couple of example settings:
| Expire starting on | Frequency | Result |
|---|---|---|
| Today’s date | Monthly | Starting today, users must accept the terms of use and then reaccept every month. |
| Date in the future | Monthly | Starting today, users must accept the terms of use. When the future date occurs, consents will expire and then users must reaccept every month. |
For example, if you set the expire starting on date to Jan 1 and frequency to Monthly, here is how expirations might occur for two users:
| User | First accept date | First expire date | Second expire date | Third expire date |
|---|---|---|---|---|
| Alice | Jan 1 | Feb 1 | Mar 1 | Apr 1 |
| Bob | Jan 15 | Feb 1 | Mar 1 | Apr 1 |
User First accept date First expire date Second expire date Third expire date Alice Jan 1 Jan 31 Mar 2 Apr 1 Bob Jan 15 Feb 14 Mar 16 Apr 15 Note - It is possible to use the Expire consents and Duration before re-acceptance requires (days) settings together, but typically you use one or the other.
Under Conditional Access, select Custom policy.
| Template | Description |
|---|---|
| Access to cloud apps for all guests | A Conditional Access policy will be created for all guests and all cloud apps. This policy impacts the Azure portal. Once this is created, you might be required to sign-out and sign-in. |
| Access to cloud apps for all users | A Conditional Access policy will be created for all users and all cloud apps. This policy impacts the Azure portal. Once this is created, you will be required to sign-out and sign-in. |
| Custom policy | Select the users, groups, and apps that this terms of use will be applied to. |
| Create Conditional Access policy later | This terms of use will appear in the grant control list when creating a Conditional Access policy. |
IMPORTANT - Conditional Access policy controls (including terms of use) do not support enforcement on service accounts. We recommend excluding all service accounts from the Conditional Access policy.
Custom Conditional Access policies enable granular terms of use, down to a specific cloud application or group of users. For more information, see https://docs.microsoft.com/en-us/azure/active-directory/conditional-access/require-tou.


You can choose to Accept or Decline.
View report of who has accepted and declined
The Terms of use blade shows a count of the users who have accepted and declined. These counts and who accepted/declined are stored for the life of the terms of use.

In Microsoft Azure, in Identity Governance > Terms of use, locate your terms of use.
For a terms of use, select the numbers under Accepted or Declined to view the current state for users.
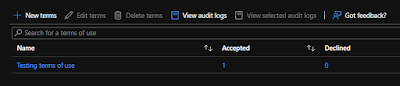
In the following example, the Accepted value was selected. You can see the reported user information for those that have accepted the terms of use.

Lab 27: Manage the lifecycle of external users in Azure AD Identity Governance settings
Lab scenario
You can select what happens when an external user, who was invited to your directory through an access package request being approved, no longer has any access package assignments. This can happen if the user relinquishes all their access package assignments, or their last access package assignment expires. By default, when an external user no longer has any access package assignments, they are blocked from signing in to your directory. After 30 days, their guest user account is removed from your directory.
Exercise 1 - Azure AD Identity Governance settings
Task 1 - Manage the lifecycle of external users in Azure AD Identity Governance settings


In the Manage the lifecycle of external users section, review the different settings for external users.
When an external user loses their last assignment to any access packages, if you want to block them from signing in to this directory, set the Block external user from signing in to this directory to Yes.
If a user is blocked from signing in to the directory, the user will be unable to re-request the access package or request additional access in this directory. Do not configure blocking them from signing in if they will subsequently need to request access to other access packages.
Once an external user loses their last assignment to any access packages, if you want to remove their guest user account in this directory, set Remove external user to Yes.
Note - Entitlement management only removes accounts that were invited through entitlement management. Also, note that a user will be blocked from signing in and removed from this directory even if that user was added to resources in this directory that were not access package assignments. If the guest was present in this directory prior to receiving access package assignments, they will remain. However, if the guest was invited through an access package assignment, and after being invited was also assigned to a OneDrive for Business or SharePoint Online site, they will still be removed.
If you want to remove the guest user account in this directory, you can set the number of days before it is removed. If you want to remove the guest user account as soon as they lose their last assignment to any access packages, set Number of days before removing external user from this directory to 0
PIM 特權身分
設定時間區間
Lab 28: Configure Privileged Identity Management for Azure AD roles
A Privileged role administrator can customize Privileged Identity Management (PIM) in their Azure Active Directory (Azure AD) organization, including changing the experience for a user who is activating an eligible role assignment. You must become familiar with configuring PIM.


Task 2 - Require approval to activate


Lab 29: Assign Azure AD roles in Privileged Identity Management
Lab scenario
With Azure Active Directory (Azure AD), a Global administrator can make permanent Azure AD admin role assignments. These role assignments can be created using the Azure portal or using PowerShell commands.
The Azure AD Privileged Identity Management (PIM) service also allows Privileged role administrators to make permanent admin role assignments. Additionally, Privileged role administrators can make users eligible for Azure AD admin roles. An eligible administrator can activate the role when they need it, and then their permissions expire once they’re done.


On the Settings tab, under Assignment type, review the available options. For this task, use the default setting.
- Eligible assignments require the member of the role to perform an action to use the role. Actions might include performing a multi-factor authentication (MFA) check, providing a business justification, or requesting approval from designated approvers.
- Active assignments do not require the member to perform any action to use the role. Members assigned as active have the privileges always assigned to the role.
Log in with Miriam


Verification - Based on our current lab environment configuration, you will be required configure MFA and log in successfully.
After you have completed the additional security verification, in the Activate – Compliance Administrator pane, in the Reason box, enter the This is my justification for activating this role.
Important Note - the principal of least prvilege, you should only activate the account for the amount of time you need it. If the work needed to be done, only takes 1.5 hours, then set the duration to two hours. Similarily, if you know that you won’t be able to do the work until after 3pm, choose a Custom activation time.
- Select Activate.


沒有留言:
張貼留言